Wednesday, January 20, 2016

Moisture Intrusion

Moisture intrusion can be the cause of building defects, as well as health ailments for the building's occupants. Inspectors should have at least a basic understanding of how moisture may enter a building, and where problem areas commonly occur.
 
Some common moisture-related problems include:
  • structural wood decay; 
  • high indoor humidity and resulting condensation;
  • expansive soil, which may crack the foundation through changes in volume, or softened soil, which may lose its ability to support an overlying structure;
  • undermined foundations;
  • metal corrosion;
  • ice dams; and
  • mold growth.  Mold can only grow in the presence of high levels of moisture. People who suffer from the following conditions can be seriously (even fatally) harmed if exposed to elevated levels of airborne mold spores:
    • asthma;
    • allergies;
    • lung disease; and/or
    • compromised immune systems.
Note:  People who do not suffer from these ailments may still be harmed by elevated levels of airborne mold spores.
How does moisture get into the house?
Moisture or water vapor moves into a house in the following ways:
  • air infiltration. Air movement accounts for more than 98% of all water vapor movement in building cavities. Air naturally moves from high-pressure areas to lower ones by the easiest path possible, such as a hole or crack in the building envelope. Moisture transfer by air currents is very fast (in the range of several hundred cubic feet of air per minute). Replacement air will infiltrate through the building envelope unless unintended air paths are carefully and permanently sealed;
  • by diffusion through building material. Most building materials slow moisture diffusion, to a large degree, although they never stop it completely;
  • leaks from roof;
  • plumbing leaks; 
  • flooding, which can be caused by seepage from runoff or rising groundwater; it may be seasonal or catastrophic; and
  • human activities, including bathing, cooking, dishwashing and washing clothes. Indoor plants, too, may be a significant source of high levels of humidity.
Climate Zones
 
In the northern U.S., moisture vapor problems are driven primarily by high indoor relative humidity levels, combined with low outdoor temperatures during the winter. In the southern U.S. (especially the southeast), the problem is largely driven by high outdoor humidity and low indoor temperatures during summer months. Mixed climates are exposed to both conditions and can experience both types of problems. Humid climates, in general, will be more of a problem than dry climates. Wind-driven rain is the main cause of leaks through the building envelope.
 
Inspectors can check for moisture intrusion in the following areas:
Roofs
A roof leak may lead to the growth of visible mold colonies in the attic that can grow unnoticed. Roof penetrations increase the likelihood of water leaks due to failed gaskets, sealants and flashing. The number of roof penetrations may be reduced by a variety of technologies and strategies, including: 
  • consolidation of vent stacks below the roof;
  • exhaust fan caps routed through walls instead of the roof;
  • high-efficiency combustion appliances, which can be sidewall-vented;
  • electrically powered HVAC equipment and hot water heaters that do not require flue; and
  • adequate flashing. Oftentimes, inspectors discover missing, incorrectly installed or corroded flashing pipes.
Plumbing
  • Distribution pipes and plumbing fixtures can be the source of large amounts of moisture intrusion. If the wall is moist and/or discolored, then moisture damage is already in progress. Most plumbing is hidden in the walls, so serious problems can begin unnoticed.
  • One of the most important means of moisture management in the bathroom is the exhaust fan. A non-functioning exhaust fan overloads the bathroom with damp air. If the exhaust fan doesn’t turn on automatically when the bathroom is in use, consider recommending switching the wiring or switch. The lack of an exhaust fan should be called out in the inspection report. The fan should vent into the exterior, not into the attic.
  • The bathroom sink, in particular, is a common source of moisture intrusion and damage. Although overflow drains can prevent the spillage of water onto the floor, they can become corroded and allow water to enter the cabinet.  
  • Use a moisture meter to check for elevated moisture levels in the sub-floor around the toilet and tub.
  • Bathroom windows need to perform properly in a wide range of humidity and temperature conditions. Check to see if there are any obvious breaks in the weatherstripping and seals. Are there are stains or flaking on the painted surfaces?
  • Check showers and bathtubs. Is the caulking is cracked, stiff or loose in spots? Are there cracked tiles or missing grout that may channel water to vulnerable areas? If some water remains in the bathtub after draining, it may be a warning sign of possible structural weakening and settlement in the floor beneath the tub.
Utility Room
  • The water heater tank should be clean and rust-free.
  • The area around the water softener tank should be clean and dry.
  • Check that all through-the-wall penetrations for fuel lines, ducts, and electrical systems of heating system are well-sealed. All ducts should be clean and dust-free. Inspect the air supply registers in the house for dust accumulation.   
  • Filters, supply lines, exterior wall penetrations, vents, ductwork and drainage of the cooling system must all be in good working order to avoid moisture problems.  
Attic
  • Look for stains or discolorations at all roof penetrations. Chimneys, plumbing vents and skylight wells are common places where moisture may pass through the roof. Any such locations must be inspected for wetness, a musty smell and/or visible signs of mold.
  • Are there areas of the insulation that appear unusually thin?
  • Rust or corrosion around recessed lights are signs of a potential electrical hazard.
Foundations

Model building codes typically require damp-proofing of foundation walls. The damp-proofing shall be applied from the top of the footing to the finished grade. Parging of foundation walls should be damp-proofed in one of the following ways:
  • bituminous coating;
  • 3 pounds per square yard of acrylic modified cement;
  • 1/8-inch coat of surface-bonding cement; or
  • any material permitted for water-proofing.

In summary, moisture can enter a building in a number of different ways. High levels of moisture can cause building defects and health ailments. 

by Nick Gromicko and Kenton Shepard

Insulation R-Value

As energy efficiency has become an increasing concern among builders and homeowners, the attributes and performance of building materials and components are being scrutinized more closely.  In order to maximize levels of efficiency by examining the details of how each individual component of a house performs on its own and as part of a dynamic system, very specific properties are measured and taken into account.  This can be especially helpful when trying to select the best building materials for a given application.  R-value is the measurement used when quantifying a specific material’s level of thermal resistance, which is the inverse of U-value, which measures thermal conductance.  R-value is often the standard consideration when discussing the effectiveness of insulation.  Inspectors may want to be familiar with the specifics of R-value ratings, especially when inspecting insulation and if they also perform energy audits.
How Does R-Value Relate to Insulation?
Heating and cooling costs account for 50% to 70% of energy used in an average U.S. home. Inadequate insulation can account for a lot of wasted energy, so it is important to be sure that insulation installed is doing its job properly.  The function of insulation is to provide resistance to the flow of heat, and R-value is the measure of exactly this attribute for a given material.  A higher R-value equates to higher resistance to heat flow and greater effectiveness in insulating.  An insulation material’s R-value, in conjunction with how and where it is installed, will determine its overall thermal resistance and effectiveness.  Adding the R-values of each layer of material contained in one building component, such as a wall or ceiling with multiple layers of insulation, will help determine the thermal resistance of the whole component.  The way the insulation is installed, as well as other factors, will also affect its thermal resistance.
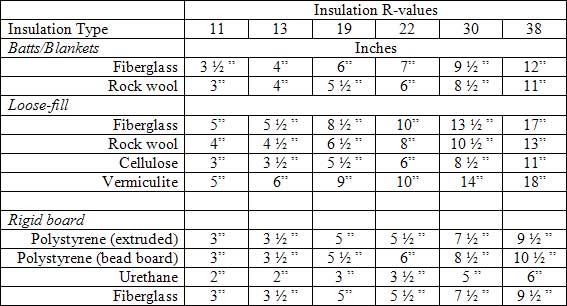
Important Factors to Consider When Measuring Thermal Resistance
When considering R-value as a means to determine the thermal resistance of a building component, there are other factors that must also be taken into account.  While R-values are an excellent guide for comparing the attributes of different insulation products, they apply only when the insulation is properly installed.  For example, if two layers of insulation are smashed into the thickness intended for one layer, the R-value does not double.  Likewise, if a single layer of insulation is compressed during installation, it will not be as effective.  Stuffing batt insulation sized for 5 inches into a 4-inch wall cavity will actually lower its R-value.  Ensuring that insulation is correctly installed will help allow the product’s full benefits to be realized.
Also important to consider is the fact that even when installed correctly, insulation affects heat transfer through the insulation itself but not through other materials, such as glass windows and studs.  If there are structural gaps in any building penetrations, even insulation with a high R-value that's installed properly cannot mitigate heat loss from air leaks.  Studs and windows provide a parallel heat conduction path, and insulation between studs in a wall does not restrict heat flow through the studs.  This heat flow is called thermal bridging, and the overall R-value of the wall will be different from the R-value of the insulation itself. 
Calculating and Converting R-Value
The equation used to calculate R-value may be of interest to some inspectors because if the R-value is known, the equation can also be used to help calculate heat loss.  The equation for determining R-value is as follows:
R-value = temperature difference x area x time ÷ heat loss
The temperature difference is expressed in degrees Fahrenheit, the area in square feet, the time in hours, and heat loss in BTUs.  Since European R-value uses different units of measure (Celsius, Kelvin, meters, etc.), it may be helpful to know how to convert a European R-value into a U.S. R-value.  This is done by multiplying the European value by 0.176 and dividing 1 by the result.
The FTC and DOE on R-Value
In the 1970s, the Federal Trade Commission (FTC) created a rule requiring insulation manufacturers to disclose R-values at the point of sale and in some ads.  This is intended to protect purchasers from false claims made by manufacturers and to create a standard of comparison for products. 
The U.S. Department of Energy (DOE) has issued recommendations for insulation R-values in new and existing homes.  The recommendations are based on a comparison of the cost for installing insulation versus potential future energy savings.  Their recommendations for attics, cathedral ceilings, walls and floors are generally greater than what is actually required by most current building codes.
R-value ratings are a useful tool, especially when comparing the effectiveness of insulation products, but understanding a bit about how other factors affect a building component’s thermal resistance is important if insulation is to be used to its full benefit. 
Inspectors who know more about insulation R-values will be in a better position to utilize this rating most effectively, as well as answer questions that their clients may have about their home's insulation and overall energy efficiency.  

by Nick Gromicko and Ethan Ward

Carbon Monoxide Poisoning and Detectors

Carbon monoxide (CO) is a colorless, odorless, poisonous gas that forms from incomplete combustion of fuels, such as natural or liquefied petroleum gas, oil, wood or coal.
Facts and Figures
  • 480 U.S. residents died between 2001 and 2003 from non-fire-related carbon-monoxide poisoning.
  • Most CO exposures occur during the winter months, especially in December (including 56 deaths, and 2,157 non-fatal exposures), and in January (including 69 deaths and 2,511 non-fatal exposures). The peak time of day for CO exposure is between 6 and 10 p.m.
  • Many experts believe that CO poisoning statistics understate the problem. Because the symptoms of CO poisoning mimic a range of common health ailments, it is likely that a large number of mild to mid-level exposures are never identified, diagnosed, or accounted for in any way in carbon monoxide statistics.
  • Out of all reported non-fire carbon-monoxide incidents, 89% or almost nine out of 10 of them take place in a home.
Physiology of Carbon Monoxide Poisoning
When CO is inhaled, it displaces the oxygen that would ordinarily bind with hemoglobin, a process the effectively suffocates the body. CO can poison slowly over a period of several hours, even in low concentrations. Sensitive organs, such as the brain, heart and lungs, suffer the most from a lack of oxygen.
High concentrations of carbon monoxide can kill in less than five minutes. At low concentrations, it will require a longer period of time to affect the body. Exceeding the EPA concentration of 9 parts per million (ppm) for more than eight hours may have adverse health affects. The limit of CO exposure for healthy workers, as prescribed by the U.S. Occupational Health and Safety Administration, is 50 ppm.
Potential Sources of Carbon Monoxide

Any fuel-burning appliances which are malfunctioning or improperly installed can be a source of CO, such as:
  • furnaces;
  • stoves and ovens;
  • water heaters;Cars should never be left running in a garage
  • dryers; 
  • room and space heaters; 
  • fireplaces and wood stoves;
  • charcoal grills;
  • automobiles;
  • clogged chimneys or flues;
  • space heaters;
  • power tools that run on fuel;
  • gas and charcoal grills;
  • certain types of swimming pool heaters; and 
  • boat engines.
PPM
% CO 
in air
Health Effects in Healthy Adults
Source/Comments
0
0%
no effects; this is the normal level in a properly operating heating appliance

35
0.0035%
maximum allowable workplace exposure limit for an eight-hour work shift
The National Institute for Occupational Safety and Health (NIOSH)
50
0.005%
maximum allowable workplace exposure limit for an eight-hour work shift
              OSHA
100
0.01%
slight headache, fatigue, shortness of breath, 
errors in judgment

125
0.0125%

workplace alarm must sound (OSHA)
200
0.02%
headache, fatigue, 
nausea, dizziness

400
0.04%
severe headache, fatigue, nausea, dizziness, confusion; can be life-threatening after three hours of exposure
evacuate area immediately
800
0.08%
convulsions, loss of consciousness;
death within three hours
evacuate area immediately
12,000
1.2%
nearly instant death

CO Detector Placement

CO detectors can monitor exposure levels, but do not place them:
  • directly above or beside fuel-burning appliances, as appliances may emit a small amount of carbon monoxide upon start-up;
  • within 15 feet of heating and cooking appliances, or in or near very humid areas, such as bathrooms;
  • within 5 feet of kitchen stoves and ovens, or near areas locations where household chemicals and bleach are stored (store such chemicals away from bathrooms and kitchens, whenever possible);
  • in garages, kitchens, furnace rooms, or in any extremely dusty, dirty, humid, or greasy areas;
  • in direct sunlight, or in areas subjected to temperature extremes. These include unconditioned crawlspaces, unfinished attics, un-insulated or poorly insulated ceilings, and porches;
  • in turbulent air near ceiling fans, heat vents, air conditioners, fresh-air returns, or open windows. Blowing air may prevent carbon monoxide from reaching the CO sensors.
Do place CO detectors:
  • within 10 feet of each bedroom door and near all sleeping areas, where it can wake sleepers. The Consumer Product Safety Commission (CPSC) and Underwriters Laboratories (UL) recommend that every home have at least one carbon monoxide detector for each floor of the home, and within hearing range of each sleeping area;
  • on every floor of your home, including the basement (source:  International Association of Fire Chiefs/IAFC);
  • near or over any attached garage. Carbon monoxide detectors are affected by excessive humidity and by close proximity to gas stoves (source:  City of New York);
  • near, but not directly above, combustion appliances, such as furnaces, water heaters, and fireplaces, and in the garage (source:  UL); and
  • on the ceiling in the same room as permanently installed fuel-burning appliances, and centrally located on every habitable level, and in every HVAC zone of the building (source:  National Fire Protection Association 720). This rule applies to commercial buildings.
In North America, some national, state and local municipalities require installation of CO detectors in new and existing homes, as well as commercial businesses, among them:  Illinois, Massachusetts, Minnesota, New Jersey, Vermont and New York City, and the Canadian province of Ontario. Installers are encouraged to check with their local municipality to determine what specific requirements have been enacted in their jurisdiction.
How can I prevent CO poisoning?
  • Purchase and install carbon monoxide detectors with labels showing that they meet the requirements of the new UL standard 2034 or Comprehensive Safety Analysis 6.19 safety standards.
  • Make sure appliances are installed and operated according to the manufacturer's instructions and local building codes. Have the heating system professionally inspected by an InterNACHI inspector and serviced annually to ensure proper operation. The inspector should also check chimneys and flues for blockages, corrosion, partial and complete disconnections, and loose connections.
  • Never service fuel-burning appliances without the proper knowledge, skill and tools. Always refer to the owner's manual when performing minor adjustments and when servicing fuel-burning equipment.
  • Never operate a portable generator or any other gasoline engine-powered tool either in or near an enclosed space, such as a garage, house or other building. Even with open doors and windows, these spaces can trap CO and allow it to quickly build to lethal levels.
  • Never use portable fuel-burning camping equipment inside a home, garage, vehicle or tent unless it is specifically designed for use in an enclosed space and provides instructions for safe use in an enclosed area.
  • Never burn charcoal inside a home, garage, vehicle or tent.
  • Never leave a car running in an attached garage, even with the garage door open.
  • Never use gas appliances, such as ranges, ovens or clothes dryers to heat your home.
  • Never operate un-vented fuel-burning appliances in any room where people are sleeping.
  • During home renovations, ensure that appliance vents and chimneys are not blocked by tarps or debris. Make sure appliances are in proper working order when renovations are complete.
  • Do not place generators in the garage or close to the home. People lose power in their homes and get so excited about using their gas-powered generator that they don't pay attention to where it is placed. The owner's manual should explain how far the generator should be from the home.
  • Clean the chimney. Open the hatch at the bottom of the chimney to remove the ashes.  Hire a chimney sweep annually.
  • Check vents. Regularly inspect your home's external vents to ensure they are not obscured by debris, dirt or snow.

In summary, carbon monoxide is a dangerous poison that can be created by various household appliances. CO detectors must be placed strategically throughout the home or business in order to alert occupants of high levels of the gas.

by Nick Gromicko

15 Tools Every Homeowner Should Own

The following items are essential tools, but this list is by no means exhaustive. Feel free to ask an InterNACHI inspector during your next inspection about other tools that you might find useful. 

1.  Plunger
Standard plungerA clogged sink or toilet is one of the most inconvenient household problems that you will face. With a plunger on hand, however, you can usually remedy these plumbing issues relatively quickly. It is best to have two plungers -- one for the sink and one for the toilet.

2.  Combination Wrench Set
One end of a combination wrench set is open and the other end is a closed loop. Nuts and bolts are manufactured in standard and metric sizes, and because both varieties are widely used, you’ll need both sets of wrenches. For the most control and leverage, always pull the wrench toward you, instead of pushing on it. Also, avoid over-tightening.

3.  Slip-Joint Pliers
Use slip-joint pliers to grab hold of a nail, a nut, a bolt, and much more. These types of pliers are versatile because of the jaws, which feature both flat and curved areas for gripping many types of objects. There is also a built-in slip-joint, which allows the user to quickly adjust the jaw size to suit most tasks.

4.  Adjustable WrenchCaulking gun
Adjustable wrenches are somewhat awkward to use and can damage a bolt or nut if they are not handled properly. However, adjustable wrenches are ideal for situations where you need two wrenches of the same size. Screw the jaws all the way closed to avoid damaging the bolt or nut.

5.  Caulking Gun
Caulking is the process of sealing up cracks and gaps in various structures and certain types of piping. Caulking can provide noise mitigation and thermal insulation, and control water penetration. Caulk should be applied only to areas that are clean and dry.
6.  Flashlight
None of the tools in this list is of any use if you cannot visually inspect the situation. The problem, and solution, are apparent only with a good flashlight. A traditional two-battery flashlight is usually sufficient, as larger flashlights may be too unwieldy.
7.  Tape Measure
Measuring house projects requires a tape measure -- not a ruler or a yardstick. Tape measures come in many lengths, although 25 feet is best.  Measure everything at least twice to ensure accuracy.
8.  Hacksaw
A hacksaw is useful for cutting metal objects, such as pipes, bolts and brackets. Torpedo levelHacksaws look thin and flimsy, but they’ll easily cut through even the hardest of metals. Blades are replaceable, so focus your purchase on a quality hacksaw frame.
9. Torpedo Level
Only a level can be used to determine if something, such as a shelf, appliance or picture, is correctly oriented. The torpedo-style level is unique because it not only shows when an object is perfectly horizontal or vertical, but it also has a gauge that shows when an object is at a 45-degree angle. The bubble in the viewfinder must be exactly in the middle -- not merely close.

10.  Safety Glasses / Goggles
For all tasks involving a hammer or a power tool, you should always wear safety glasses or goggles. They should also be worn while you mix chemicals.

11.  Claw Hammer
A good hammer is one of the most important tools you can own.  Use it to drive and remove nails, to pry wood loose from the house, and in combination with other tools. They come in a variety of sizes, although a 16-ounce hammer is the best all-purpose choice.

12.  Screwdriver Set
It is best to have four screwdrivers: a small and large version of both a flathead and a Phillips-head screwdriver. Electrical screwdrivers areWire cutter sometimes convenient, but they're no substitute.  Manual screwdrivers can reach into more places and they are less likely to damage the screw. 

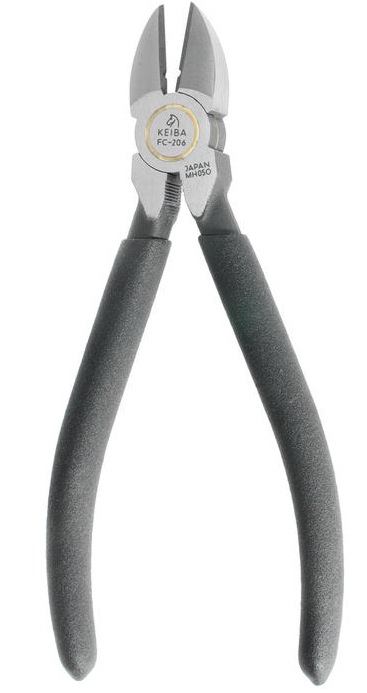
13.  Wire Cutters
Wire cutters are pliers designed to cut wires and small nails. The side-cutting style (unlike the stronger end-cutting style) is handy, but not strong enough to cut small nails.

14.  Respirator / Safety Mask
While paints and other coatings are now manufactured to be less toxic (and lead-free) than in previous decades, most still contain dangerous chemicals, which is why you should wear a mask to avoid accidentally inhaling. A mask should also be worn when working in dusty and dirty environments. Disposable masks usually come in packs of 10 and should be thrown away after use. Full and half-face respirators can be used to prevent the inhalation of very fine particles that ordinary facemasks will not stop. 
15.  Duct Tape
This tape is extremely strong and adaptable. Originally, it was widely used to make temporary repairs to many types of military equipment. Today, it’s one of the key items specified for home emergency kits because it is water-resistant and extremely sticky.

10 Easy Ways to Save Money & Energy in Your Home

Most people don’t know how easy it is to make their homes run on less energy, and here at InterNACHI, we want to change that. 

Drastic reductions in heating, cooling and electricity costs can be accomplished through very simple changes, most of which homeowners can do themselves. Of course, for homeowners who want to take advantage of the most up-to-date knowledge and systems in home energy efficiency, InterNACHI energy auditors can perform in-depth testing to find the best energy solutions for your particular home. 
Why make your home more energy efficient? Here are a few good reasons:
  • Federal, state, utility and local jurisdictions' financial incentives, such as tax breaks, are very advantageous for homeowners in most parts of the U.S.
  • It saves money. It costs less to power a home that has been converted to be more energy-efficient.
  • It increases the comfort level indoors.
  • It reduces our impact on climate change. Many scientists now believe that excessive energy consumption contributes significantly to global warming.
  • It reduces pollution. Conventional power production introduces pollutants that find their way into the air, soil and water supplies.
1. Find better ways to heat and cool your house. 
As much as half of the energy used in homes goes toward heating and cooling. The following are a few ways that energy bills can be reduced through adjustments to the heating and cooling systems:
  • Install a ceiling fan. Ceiling fans can be used in place of air conditioners, which require a large amount of energy.
  • Periodically replace air filters in air conditioners and heaters.
  • Set thermostats to an appropriate temperature. Specifically, they should be turned down at night and when no one is home. In most homes, about 2% of the heating bill will be saved for each degree that the thermostat is lowered for at least eight hours each day. Turning down the thermostat from 75° F to 70° F, for example, saves about 10% on heating costs.
  • Install a programmable thermostat. A programmable thermostat saves money by allowing heating and cooling appliances to be automatically turned down during times that no one is home and at night. Programmable thermostats contain no mercury and, in some climate zones, can save up to $150 per year in energy costs.
  • Install a wood stove or a pellet stove. These are more efficient sources of heat than furnaces.
  • At night, curtains drawn over windows will better insulate the room.
2. Install a tankless water heater.
Demand-type water heaters (tankless or instantaneous) provide hot water only as it is needed. They don't produce the standby energy losses associated with traditional storage water heaters, which will save on energy costs. Tankless water heaters heat water directly without the use of a storage tank. When a hot water tap is turned on, cold water travels through a pipe into the unit. A gas burner or an electric element heats the water. As a result, demand water heaters deliver a constant supply of hot water. You don't need to wait for a storage tank to fill up with enough hot water.
3. Replace incandescent lights.
The average household dedicates 11% of its energy budget to lighting. Traditional incandescent lights convert approximately only 10% of the energy they consume into light, while the rest becomes heat. The use of new lighting technologies, such as light-emitting diodes (LEDs) and compact fluorescent lamps (CFLs), can reduce the energy use required by lighting by 50% to 75%. Advances in lighting controls offer further energy savings by reducing the amount of time that lights are on but not being used. Here are some facts about CFLs and LEDs:
  • CFLs use 75% less energy and last about 10 times longer than traditional incandescent bulbs.
  • LEDs last even longer than CFLs and consume less energy.
  • LEDs have no moving parts and, unlike CFLs, they contain no mercury.
4. Seal and insulate your home.
Sealing and insulating your home is one of the most cost-effective ways to make a home more comfortable and energy-efficient, and you can do it yourself. A tightly sealed home can improve comfort and indoor air quality while reducing utility bills. An InterNACHI energy auditor can assess  leakage in the building envelope and recommend fixes that will dramatically increase comfort and energy savings.
The following are some common places where leakage may occur:
  • electrical receptacles/outlets;
  • mail slots;
  • around pipes and wires;
  • wall- or window-mounted air conditioners;
  • attic hatches;
  • fireplace dampers;
  • inadequate weatherstripping around doors;
  • baseboards;
  • window frames; and
  • switch plates.
Because hot air rises, air leaks are most likely to occur in the attic. Homeowners can perform a variety of repairs and maintenance to their attics that save them money on cooling and heating, such as: 
  • Plug the large holes. Locations in the attic where leakage is most likely to be the greatest are where walls meet the attic floor, behind and under attic knee walls, and in dropped-ceiling areas.
  • Seal the small holes. You can easily do this by looking for areas where the insulation is darkened. Darkened insulation is a result of dusty interior air being filtered by insulation before leaking through small holes in the building envelope. In cold weather, you may see frosty areas in the insulation caused by warm, moist air condensing and then freezing as it hits the cold attic air. In warmer weather, you’ll find water staining in these same areas. Use expanding foam or caulk to seal the openings around plumbing vent pipes and electrical wires. Cover the areas with insulation after the caulk is dry.
  • Seal up the attic access panel with weatherstripping. You can cut a piece of fiberglass or rigid foamboard insulation in the same size as the attic hatch and glue it to the back of the attic access panel. If you have pull-down attic stairs or an attic door, these should be sealed in a similar manner.
5. Install efficient showerheads and toilets.
The following systems can be installed to conserve water usage in homes:
  • low-flow showerheads. They are available in different flow rates, and some have a pause button which shuts off the water while the bather lathers up;
  • low-flow toilets. Toilets consume 30% to 40% of the total water used in homes, making them the biggest water users. Replacing an older 3.5-gallon toilet with a modern, low-flow 1.6-gallon toilet can reduce usage an average of 2 gallons-per-flush (GPF), saving 12,000 gallons of water per year. Low-flow toilets usually have "1.6 GPF" marked on the bowl behind the seat or inside the tank;
  • vacuum-assist toilets. This type of toilet has a vacuum chamber that uses a siphon action to suck air from the trap beneath the bowl, allowing it to quickly fill with water to clear waste. Vacuum-assist toilets are relatively quiet; and
  • dual-flush toilets. Dual-flush toilets have been used in Europe and Australia for years and are now gaining in popularity in the U.S. Dual-flush toilets let you choose between a 1-gallon (or less) flush for liquid waste, and a 1.6-gallon flush for solid waste. Dual-flush 1.6-GPF toilets reduce water consumption by an additional 30%.
6. Use appliances and electronics responsibly.
Appliances and electronics account for about 20% of household energy bills in a typical U.S. home. The following are tips that will reduce the required energy of electronics and appliances:
  • Refrigerators and freezers should not be located near the stove, dishwasher or heat vents, or exposed to direct sunlight. Exposure to warm areas will force them to use more energy to remain cool.  
  • Computers should be shut off when not in use. If unattended computers must be left on, their monitors should be shut off. According to some studies, computers account for approximately 3% of all energy consumption in the United States.
  • Use efficient ENERGY STAR-rated appliances and electronics. These devices, approved by the U.S. Department of Energy and the Environmental Protection Agency’s ENERGY STAR Program, include TVs, home theater systems, DVD players, CD players, receivers, speakers, and more. According to the EPA, if just 10% of homes used energy-efficient appliances, it would reduce carbon emissions by the equivalent of 1.7 million acres of trees.
  • Chargers, such as those used for laptops and cell phones, consume energy when they are plugged in. When they are not connected to electronics, chargers should be unplugged.
  • Laptop computers consume considerably less electricity than desktop computers.
7. Install daylighting as an alternative to electrical lighting.
Daylighting is the practice of using natural light to illuminate the home's interior. It can be achieved using the following approaches:
  • skylights. It’s important that they be double-pane or they may not be cost-effective. Flashing skylights correctly is key to avoiding leaks;
  • light shelves. Light shelves are passive devices designed to bounce light deep into a building. They may be interior or exterior. Light shelves can introduce light into a space up to 2½ times the distance from the floor to the top of the window, and advanced light shelves may introduce four times that amount;
  • clerestory windows.  Clerestory windows are short, wide windows set high on the wall. Protected from the summer sun by the roof overhang, they allow winter sun to shine through for natural lighting and warmth; and 
  • light tubes.  Light tubes use a special lens designed to amplify low-level light and reduce light intensity from the midday sun. Sunlight is channeled through a tube coated with a highly reflective material, and then enters the living space through a diffuser designed to distribute light evenly.
8. Insulate windows and doors.
About one-third of the home's total heat loss usually occurs through windows and doors. The following are ways to reduce energy lost through windows and doors:
  • Seal all window edges and cracks with rope caulk. This is the cheapest and simplest option.
  • Windows can be weatherstripped with a special lining that is inserted between the window and the frame. For doors, apply weatherstripping around the whole perimeter to ensure a tight seal when they're closed. Install quality door sweeps on the bottom of the doors, if they aren't already in place.
  • Install storm windows at windows with only single panes. A removable glass frame can be installed over an existing window.
  • If existing windows have rotted or damaged wood, cracked glass, missing putty, poorly fitting sashes, or locks that don't work, they should be repaired or replaced.
9. Cook smart.
An enormous amount of energy is wasted while cooking. The following recommendations and statistics illustrate less wasteful ways of cooking:
  • Convection ovens are more efficient that conventional ovens. They use fans to force hot air to circulate more evenly, thereby allowing food to be cooked at a lower temperature. Convection ovens use approximately 20% less electricity than conventional ovens.
  • Microwave ovens consume approximately 80% less energy than conventional ovens.
  • Pans should be placed on the matching size heating element or flame. 
  • Using lids on pots and pans will heat food more quickly than cooking in uncovered pots and pans.
  • Pressure cookers reduce cooking time dramatically.
  • When using conventional ovens, food should be placed on the top rack. The top rack is hotter and will cook food faster. 
10. Change the way you do laundry.
  • Do not use the medium setting on your washer. Wait until you have a full load of clothes, as the medium setting saves less than half of the water and energy used for a full load.
  • Avoid using high-temperature settings when clothes are not very soiled. Water that is 140° F uses far more energy than 103° F for the warm-water setting, but 140° F isn’t that much more effective for getting clothes clean.
  • Clean the lint trap every time before you use the dryer. Not only is excess lint a fire hazard, but it will prolong the amount of time required for your clothes to dry.
  • If possible, air-dry your clothes on lines and racks.
  • Spin-dry or wring clothes out before putting them into a dryer. 
Homeowners who take the initiative to make these changes usually discover that the energy savings are more than worth the effort. InterNACHI home inspectors can make this process much easier because they can perform a more comprehensive assessment of energy-savings potential than the average homeowner can.  

by Nick Gromicko, Ben Gromicko, and Kenton Shepard